I work at a company that offers hardware-based cybersecurity products and services. Our major product is a network appliance, called a data diode, that restricts data flow in one direction (meaning you can’t hack in the opposite direction).
Before you gasp in shock, it’s a real thing, needed by real people. For example, nuclear power plants use them to secure their operational networks (OT). The data diode allows them to stream their operational data out of the OT to their enterprise networks (IT) without allowing hackers to attack or send commands into the OT.
And it’s not just critical infrastructure folks who are interested, military and intelligence organizations use us to defend their networks and data.
So there.
Self-isolating
A core concept for our data diodes is the enforcement of one-way data flow using optical isolation – usually a light transmitter and receiver pair connected with a fiberoptic cable. That means the reverse direction can’t happen. And, without the optical connection, the two sides of the data diode are effectively ‘air-gapped’.
Optoisolator chips are similar: a light diode on one side, paired with a photoresistor on the other side. Optoisoloators are usually used to isolate networks with different voltages, allowing a signal to go from one side to the other without having to unify the two voltage nets. For example, say you have a 3.3V microcontroller and you want to drive a 120V speaker.
How it works
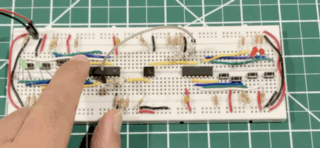
To make one-way transfer via an optoisolator more tangible, I built a prototype where two microcontrollers communicate via an optisolator. Buttons on either side are pressed and the button states are sent to the other side (via serial, if you must know), reflected in the indicator LEDs.
I chose the ATtiny84, as it is a nice and small microcontroller (MCU) and has more pins relative the more common ATtiny85. The optoisolator was the common 4N35. The rest is a bunch of wires (this being a breadboard proto), LEDs, resistors, and buttons.
For the data connection, let’s call the blue side the side that can transmit (TX) the state of the buttons through the optoisolator. The red side receives (RX) the button states. Clicking a button on the blue side will light up the corresponding LEDs on the blue and red side (the red side receiving the update). If I click a button on the red side, only the LED on the red side changes, as the red side can’t send data to the blue side, due to the optoisolator and also because the TX of the red side is not connected to the RX of the blue side.
But I put the same code on both MCUs, so the red side MCU is still trying to transmit the button states. I can show this by bridging the optoisolator with a jumper wire connecting the RX of the red side and the TX of the blue side. With the jumper in place, a button press on the red side will show a corresponding change on the blue side.
Visualizing something simple
This is a way to show how you can have something that keeps data flowing in only one direction. And the jumper shows that you actually have to physically bridge the optoisolator to get transmission in the opposite direction.
Ideally, I wanted to make this into a badge folks could play with and hack. But perhaps later. Also, the way we build our data diodes, we actually have proxies on both sides of the gap to handle more complex communication on each side of the diode. I’ve been wondering of a way to make that concept more tangible, and I have an idea how that doesn’t use MCUs. But that, too, perhaps for another time.
Summary
This build is part of some exploration of mine to make some concepts more tangible. What drives me is to how to show things that can’t be seen, how to make the digital more physical.
Check out the video below for how the proto worked out and let me know how I did.
1 Comment
Comments are closed.