As Halloween approached, I thought I could have some fun and make something to put on my front stoop. I figured a Coronavirus would make a great and thematically-appropriate decoration.
The virus
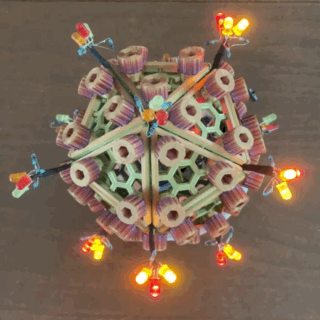
The virus has been plastered all over the place, and is a recognizable shape – that polyhedron with scary spikes all around. I did some research into various shapes and settled on a icosahedron. I know that there are polyhedra with fewer sides, but the icosahedron, with 20 faces, has only 12 vertices (yes, the dodecahedron has fewer faces but way more vertices). As I was going to be building things per vertex, a smaller number of them was preferable.
I thought of various ways to make one and settled for a curious model I bought (support you local maker!) with 20 faces, 12 brackets for the vertices, and 60 bolts. I messed with the model, really just poking a hole through the bolt and the vertex bracket to explore what I might poke through them. I settled on a hole through each vertex.
The printing process was the longest I’ve done. And because of all the small pieces, these were the first prints to fully use my printer’s print surface. Also, because I was printing with a multicolor filament, I had to print all the facets, then all the bolts, all at once, so they would all look alike.
The spikes
For the spikes, I made a wee freeform cluster of resistors and LEDs.
Part of the spark of this project was the number of LEDs I’d accumulated. Y’see, when you sometimes buy components on Amazon, you also get a ton of other stuff you were not looking for. I had wanted to buy some blue LEDs for a previous project, and over 100 other LEDs of various colors came as part of the bargain. So, for this project, I used LEDs with abandon.
Each cluster had a red, yellow, and orange LED, and their limiting resistors, soldered and shrink-tubed onto a pair of wires that would connect to the control board. The wires were slipped through and then hot-glued to the hole that I had added to the vertex brackets.
I also had a Neopixel cluster with 7 pixels and threw that in, to pulse inside the virus. But it bugged me that it wrecked the LED trend, so I also put a red, yellow, and orange to do that instead.
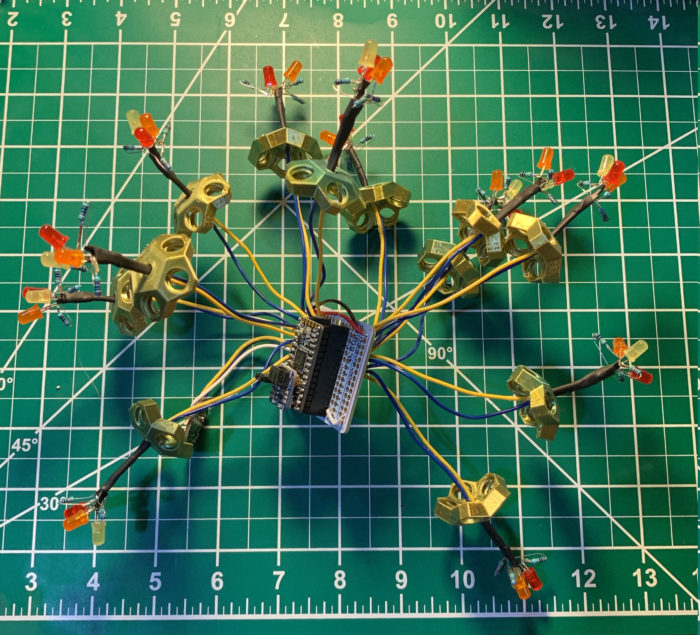
The heart
At the heart of all this is a ItsyBitsy M0 with a battery backpack, mounted on headers on a protoboard. The clusters were passed through the vertex brackets and connected to the protoboard. [I mounted the Itsy on headers as I was not prepared to sacrifice it to the project, haha.]
OK, I could have just connected all the LEDs to a battery and be done. Or if I were just blinking the LEDs, I could have used a Trinket with an I/O expander. But I wanted to pulse the LEDs menacingly and independently, so needed most of the pins of the Itsy. Also, my Itsy had a battery backpack to connect and charge the battery.
I coded it all up in CircuitPython, having each pin act independently (multi-tasking). I did try to get them all to pulse. But I got stuck with a possible timer limit (“in use”), so I think I was over-tasking the processor to get it to pulse 15 pins independently. I could of hacked something, but really didn’t want to. In the end, I decided to blink the LEDs, each one set at boot time to a random on and off schedule. Later, my wife chimed in and wanted it just to be a menacing steady light. Since I could’ve done that with just a battery, we compromised in that it now is steady for 10 seconds and then blinks randomly (reset each time) for 10 seconds.
The whole thing is powered by a 500mAh LiPo and lasts for about 7 hours (last I checked). So I need to bring it in every morning to recharge (alas, takes a long time as I set the charger to 100mA rather than a 500mA rate). Only catch is, last night the temperature plunged to around 20°F, killing the power, so I had to bring it in.
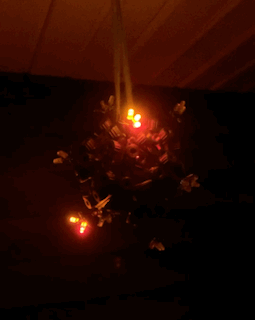
Yay. See it to the right, all hung up and blinky.
Stretch goal
Being so into making stuff with LEDs for Halloween, of course my thoughts turned to pumpkins. I saw a nice article for a light detecting circuit LED throwie type thing. I built that for the eyes (two). I carved up a pumpkin (actually, two) and used the pair as eyes in one.
Of course, I needed LEDs to light up the inside of the pumpkin, so I first threw in some LEDs dog collar tags I had. But the maker ethos is “why buy if you can make?” And since I already had code that emulated these tags from when I reverse engineered them, that’s what I did.
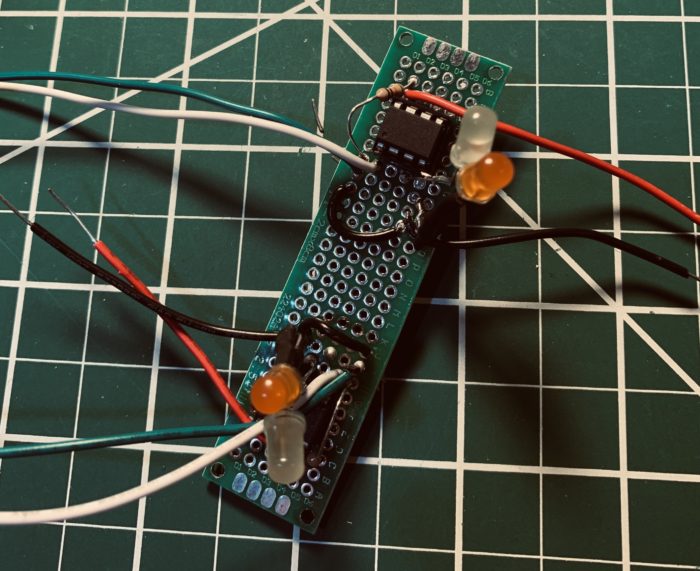
Of course, another maker ethos is “use what you have.” I had some protoboard, a few ATtinys, resistors, buttons, and, of course, some LEDs. So I built a simple circuit with a yellow and orange LED, limiting resistors, a button connected to RST, a cap (yes, between VCC and GND), an ATtiny (one 85 and one 45, because) mounted on a socket (easier, in case I needed to reprogram), all powered by a CR2032 clipped to the wires with a binder clip (it’s how we roll here at the Schick Schack).
The image to the right shows both of them (two pumpkins) before I separated them. You can see the battery wires (red and black) and the button wires (white and green) leading off the frame.
Interestingly, from the start of the build to the install was a few hours. This might have been on of the quickest concept-to-build I’ve done. And reviewing my notes, I was proud of how far I’ve come in the past year and a half. Also helps that I keep decent documentation, previous code, and have accumulated the right tools to do all of this. Really boosts one’s confidence!
As for these LED gizmos, I popped them in the pumpkins, the button on the outside, so I could change or turn off the LEDs, changing how they behave. And, yes, they can pulse. Very happy with the result.


Happy Halloween, folks.